In the early 70’s I became aware of the things that could be made with stained glass, and I began to work with it. My early efforts were crude, and many thanks are due to friends who received such pieces quietly. But, with time and experience my work improved. At one point in our salad days I paid for wallpapering one daughter’s bedroom with the proceeds from selling pieces. (I didn’t do that well; we were simply able to buy the paper and we hung it ourselves.)
Here are some pieces that I still have and hang.
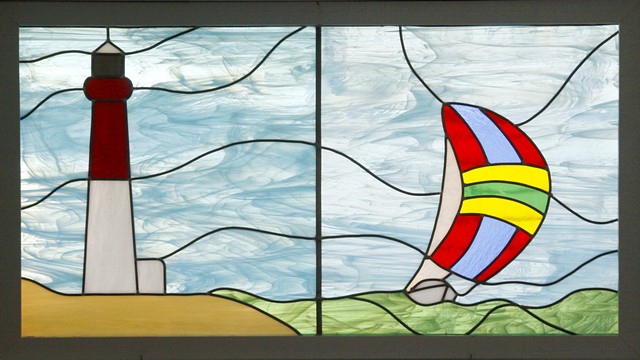
The sail boat in this 18″x30″ piece was from a purchased pattern but Old Barney is an original pattern. I made this to block the light in a high window of my old shore house’s master bedroom. In the new shore house it filters the morning sun coming into the kitchen. One of the challenges of the piece was to have the swirls in the sky and sea glass flow from one panel to the other. A second challenge was the lead lines, themselves. They’re necessary to enable doing the piece but I made them flowing with the direction of the sky and sea.
—————————————————————————-
Here’s another seashore piece which is frequently seen. The challenge was to select the background glass and then to cut the sections such that the swirls flow from one piece to another across the lead lines. Size: 14″ diameter.

—————————————————————————–
This is a piece that I created for a friend who had a large Bonsai collection. I told him he’d never have to water it. I liked it so much that I did another for myself. One thing that sets it off so nicely is the background glass I found. I wanted to suggest the plant was sitting on a window ledge but if I had used clear glass it would not have been as effective. It’s as though there were a shoji screen behind it. Size: 22.5″ x 19″

———————————————————————————–
This piece was made from a purchased pattern. It took a long time because of the many tiny pieces creating the feather details, many of which required grinding after cutting to enable fit. I remember the project chiefly because I worked on it while at an adjacent bench my late wife, Marty Lou, who was in chemo at the time, was putting together a doll house. Because of his love of hunting this will go to my favorite son-in-law, Bob, when I’m finished with it. The size: 17.5″ x 21.5″

—————————————————————————————-
A number of years ago my eye was caught by a friend’s Christmas Card. I scaled it up to a 23″ x 29″ pattern and here’s the result. I found a great piece of glass suggestive of foreboding, swirling movement in a night sky. Again, by means of careful (and lucky) cutting, the flows in the glass smoothly cross the lead lines.
The poor angel remains faceless because I lack drawing ability. In stained glass panels from the medieval through the break-thru work of Louis Comfort Tiffany to modern architectural work there are extensive painted details. My father could do it; I can’t.

——————————————————————————————————-
Sun catchers? Yep. Lots of ’em over the years. Here are two that I made for myself and still hang. They’re both frequently seen but I had to create the patterns.

—————————————————————————————-
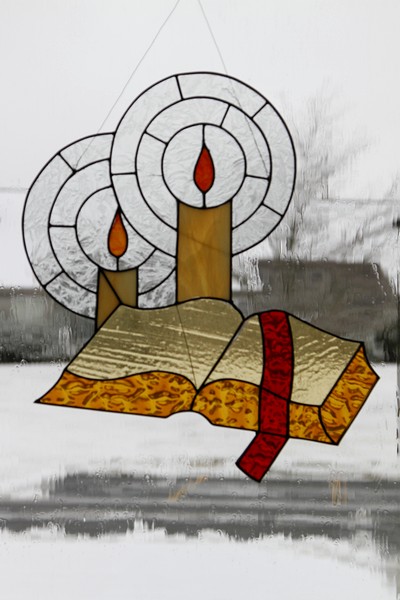
Here are three seasonal window hangers which I created for myself.


————————————————————————————————–
A February 2013 piece is this 13″ x 24″ panel of bevels surrounded by some streaky blue-white glass. I have admired bevel panels for years but never tried one. With the best of intentions I bought this set a number of years ago but life got in the way and it sat in storage until recently. I’m pleased with the result but it was more difficult than I had expected. The biggest problem was putting the bevels together with lead came. The thickness of the came core builds up such that the pieces won’t quite come together where they should. It occurred to me that perhaps they were intended to be foiled which would reduce the inter-piece buildup but I wasn’t thrilled with using foil for this piece. The solution was to lengthen the space between the upper and lower pieces and the rest of the cluster by about 3/8 of an inch. Then I ground off the tips of the pieces that were to fit into the 3/8″ vertical came strips, and it all came (no pun intended) together.
Cutting the four curves in each of the four corners from the blue-white streaky was not for the faint hearted either and I did wind up breaking one and having to cut a fifth. Then there’s the problem of getting those corners to fit well into the came surrounding the cluster. This is done by grinding down the cut curves where indicated. I’m thankful for glazer’s putty to seal some of the light cracks. The photograph was taken before final cleaning and puttying and one can see a couple of those light specs.

————————————————————————————————————–
A May 2013 piece is this rendering of the Little Egg Harbor Yacht Club’s 2012 Centennial logo. The burgee on the left was the club’s choice at its 1912 founding but it was later found to conflict with a burgee of another club. Thus, the burgee on the right became the club standard. This 13″ by 18″ panel was tedious because of the several small pieces comprising/surrounding the maltese crosses. I should have designed it larger but that might have made it unpopular as to where it would hang. The jeweled knobs at the tops of the staffs are artistic license because the staffs would have been turned with wooden knobs. Oh, well, my license.
The lead lines which lead from the jewels to the upper edge of the panel are esthetically awkward. Stained glass workers will recognize the difficulty of cutting an inside circle, and even that would still, I think, have required at least one lead line.

—————————
A BOX OF LIGHTS
A few years ago I began to see wine bottles containing strings of LEDs. These seemed formidable because of the need to drill a hole in the bottle. Then I ran across glass boxes containing light strings and they seemed more doable. From Macie Art Glass I obtained some glue chip clear glass which I thought would soften the lights in the box (desirable). I then sketched out some dimensions and cut the pieces including a mirror piece for the bottom. I also cut off a corner on one piece so that the light cord could exit, and I made it big enough so that if needed, the string of lights could be removed. I assembled it by applying 1/4″ copper foil to the edges of each piece; tinning the foil; tacking the pieces together and then applying a solder bead on all edges. Before tacking in the final piece don’t forget to put the lights inside of it. For a technique to hold the lights in place see the post below about the lantern. Here was the result:

———————–
A LIGHTED LANTERN
At a craft show I saw lanterns which the crafter had enhanced by replacing the clear glass panels and placing a string of lights inside. This certainly looked easier than all of the foiling and soldering of the glue chip boxes. Plus, I already had such a lantern in which I used to burn a candle at various times in the winter. Then I spotted some unusual and quite attractive multi-colored Spectrum glass on Macie Art Glass’s Facebook page. I managed to get their last two pieces and went to work. The basic panels were held in place with metal tabs so it was easy to cut replacement sizes and install them. The upper part of the candle chamber, however, had no glass and no tabs and the lights would be visible. So, I cut pieces a little larger than the openings and installed them with Gorilla Glue. I’m very happy with the result.

——————–
Next, holding the lights in place.
In the case of both the glue chip box and the lantern I was concerned that the clump of lights would eventually slump to the bottom. I also wanted to have the lights as much in the interior space as up against the panes. So, I decided to wrap the string around a coil of hardware cloth. This is a wire mesh product with, typically, 1/2″ holes, and it is quite stiff. (Outdoor Gardening section of Lowe’s or Home Depot.) I cut a strip of a height to fit in the lantern. I then wrapped the string around the strip, keeping each turn close to the previous. When I had all of the lights wrapped I cut off the remainder of the hardware cloth, rolled it up tightly enough to insert it, and did so.
—————-

———————–
A PANEL OF BEVELS
This is a December, 2017 completion. My daughter had requested this of me since the 2013 panel above (bevels in a frame of streaky blue-white glass.) Humph. Four years. Oh, well; it got done.
The problem was that first I had to find the desired central flower and that seemed to take a while. I finally found it and then designed a 24″ x 20″ frame comprised of mostly clear bevels. At the corners and in the frame top and sides I included 2″x 2″ bevels that had a glue-chip surface. The filler was a seedy antique clear.
I opted to frame the piece in zinc came rather than a metal frame as in the 2013 panel, and I’m pleased with the result. I also applied two zinc rods vertically to provide strength.
Overall it was, for me, a tedious and difficult project in cutting the seedy antique to match the flower petals. There was a lot of grinding to fit, and then we rely on its not being too close for viewing. Nevertheless, I’m very pleased with the result. Here it is hanging in my window.
———————-

————————-
————————-
THE FINAL CHRISTMAS PROJECT – 1/2/1818
——————————
I have long wanted to have a wine bottle with LEDs in it. In a visit to Ikea last fall I picked up a lovely red glass wine bottle and set it aside for this fate. Next, I studied several YouTube videos on the techniques of creating a hole for the wire to escape. I also acquired a string of LED lights and a set of diamond-tipped drills with which to make the hole in the bottle. Other projects and events and activities got in the way before Christmas but today I felt like playing rather than working and so …….

Yes, I’m pleased. I placed the bottle in a Pyrex bowl filled with water to drain off the drilling heat, and filled the bottle also. I used a battery operated drill because of the water in the sink. I drilled slowly and mostly let the drills’ weight do the job. Although it took a while, it eventually worked without shattering the bottle. I then fed the wiring into the bottle through a rubber grommet which I placed in the hole. Lots of anxiety but…no problem.


April 8, 2015 at 4:57 pm
I like your work Ralph. It is on my list of thinks to conquer. I recently took up glass working. Glass blowing, torch work and kiln work. I was surprised at what I could do. I took a second lesson in glass blowing and got even better. I want to continue when I stop traveling for my photography. Don’t forget Photo Club 1st Thursday at RNC at 10am.
Tom
January 3, 2018 at 9:09 am
Whew! A lifetime of lovelies!
January 3, 2018 at 11:18 am
Nicely said, special friend. As you have heard, they’re frequently delivered with a lot of blue words but looking back all the stress fades.
January 3, 2018 at 9:56 am
When I first learned you did stained glass I was impressed with your artistic prowess. Now getting to see an expanded selection of your work shows that you put the same skills and attention to detail in your stained glass as you do with your photography. I particularly like the one with “Old Barney” and the Sailboat. That one is a very nice piece of New Jersey art.
January 3, 2018 at 11:20 am
Thank you fellow artist. Yep, the old OCD kicks in on just about anything.
January 3, 2018 at 10:46 am
Your work is beautiful Ralph! I love the bevels in the one piece. I know how hard it is to get those four little pieces cut! Great work!
January 3, 2018 at 11:21 am
Thank you, Bonnie. Always appreciated. I remember that you said you had worked in glass at one time. I recommend Macie Art Glass in Lumberton. The variety of glass is mouth watering.
March 22, 2019 at 9:03 am
This is beautiful!! 🙂 Love your work!